Thursday 30 October 2014

Sew simple, homemade Christmas cards

Sew simple Christmas cards (made by a 3 year old)

Christmas is coming and my daughter is at home with me (and her baby brother) 2 days a week, so I am always looking for things we can do together.

It's an extra bonus if it isn't messy and makes something that you might actually want at the end of it! I think this ticks both of these boxes.

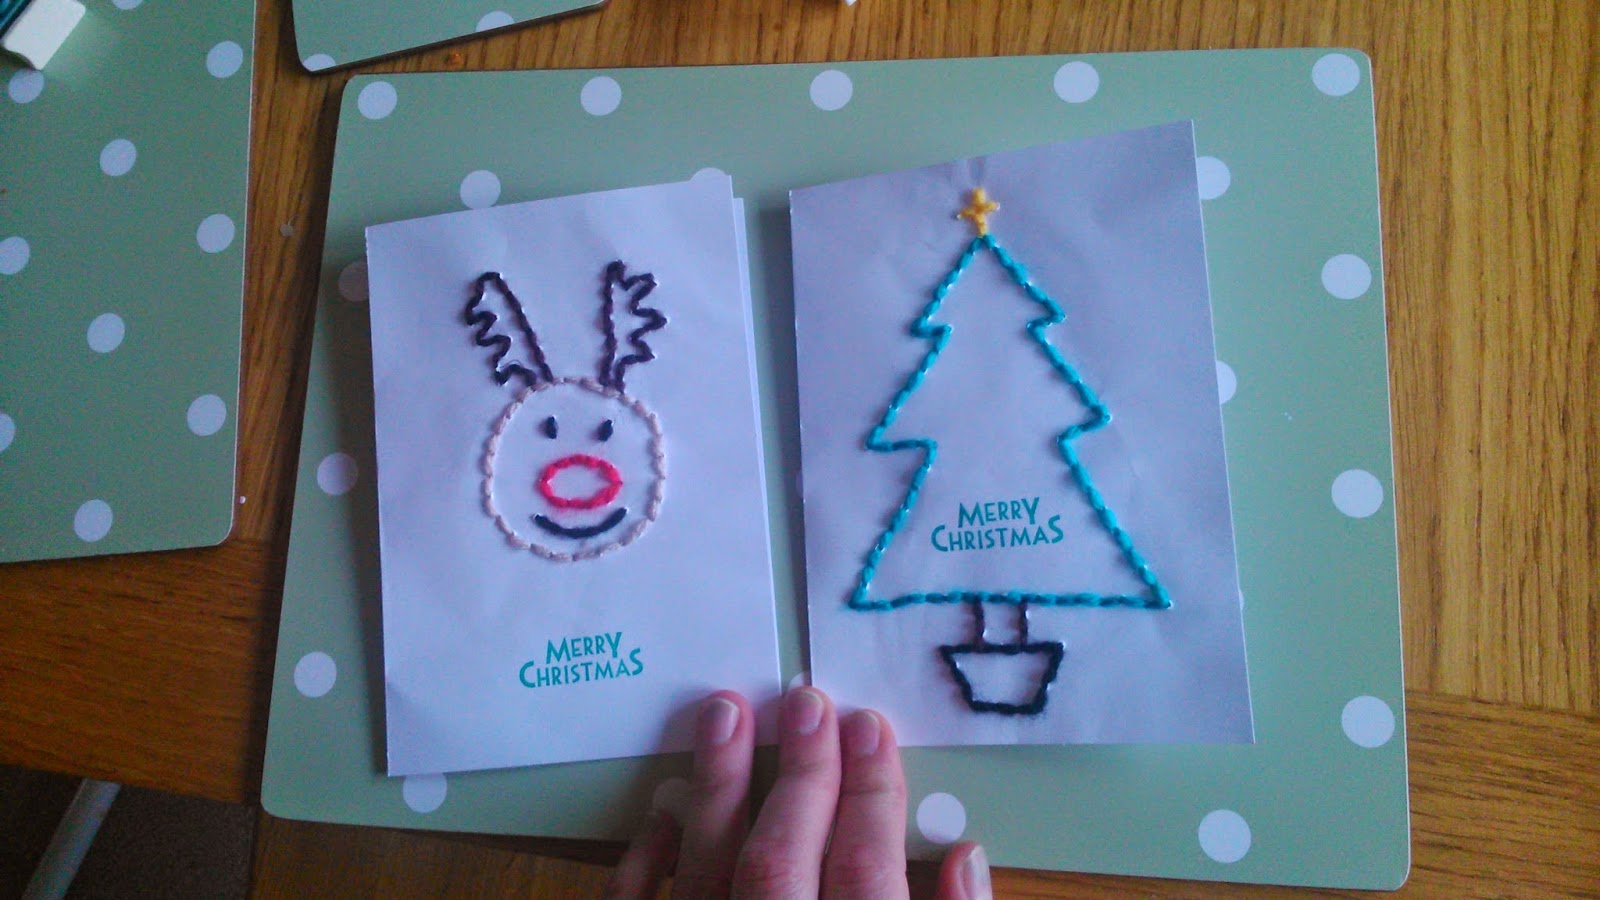
Today we made Christmas cards from blank cards and scraps of coloured wool.
Megan is only 3 and hers came out good enough to send (with help of course) so I am sure older children will enjoy this and be able to create their own designs too.

You will need...

  • Blank cards and envelopes (mine were from John Lewis)
  • Pencil
  • Bodkin (not very sharp wool needle)
  • Coloured wool
  • Merry Christmas stickers/stamp (optional - especially if your children are old enough to write, my stamp was from John Lewis)

Let's do it...

Begin by drawing out your design on the blank card. As wool is quite thick it is ok to do this on the right side (front) of the card, the wool will cover any lines.


Next take your needle and make guide holes through the card evenly around the design. This will make sewing much simpler and mean that your child is only gently pushing the needle through an existing hole rather than needing to force it through the card.


Now begin to sew between the existing holes. This should be done using back stitch where you skip a hole, and then work back to the previous hole filling in a gap. The next stitch is then started from end of the previous stitch. (repeat)


It is not essential that back stitch is used, but this avoids oversewing the whole design twice and means the back of the design shouldn't be too untidy
 
 
Finally tie off any loose ends and add a greeting of your choice.
 

Simple but I'm sure our family will like receiving cards Megan has made herself.


Friday 24 October 2014

Secret centre spooky spider (halloween) cakes


Just finished baking these spider Halloween cakes with my 3 year old. She is so pleased with them I'm not sure how she'll wait for her grandparents to come on Sunday to show them. The poor postman only just managed to get away without being dragged in to see Megan's cakes!

As well as the spider decoration on the top, these cakes also have a hidden jammy centre (and taste fantastic!)


You'll need...

For the cakes

  • 12 Cupcake cases
  • 2 large eggs
  • 120g Self raising flour
  • 140g Caster sugar
  • 140g Marg or butter
  • 30g cocoa powder
  • Jam

For the decoration
  • 12 Minstrels (or similar, like Maltesers)
  • Fruit strings/laces (see footnote)
  • (Around) 100g icing sugar
  • 5 Blackberries
 
Make the cake mix...

  1. Pre heat the oven to 160
  2. Whack the caster sugar and butter into a large bowl and whisk until light and fluffy
  3. Next sift half the flour into the bowl
  4. Add an egg
  5. Mix well
  6. Add the remaining flour, cocoa powder and egg
  7. Mix well

Make now hide the jam!

  1. Put 2 teaspoons of the cake mix into each cupcake case
  2. Then, into the centre of each case add a teaspoon of jam

  1. Gently cover the jam with the remaining cake mix (but try not to overfill)

  1. Bake for 25-30 minutes


Now for the decoration

  1. Warm the blackberries over a pan of boiling water until they are soft and can be squashed into the icing sugar

  1. Keep stirring in icing sugar until you have bright purple lumpy icing that is spreadable but not too runny (add a drop of water if necessary)

  1. Ice each of the cakes and allow to set for a couple of minutes while you cut up the laces to make legs


  1. Place a Minstrel into the centre of each cake, and then push the legs gently into the icing around the Minstrel (using artist licence about how many legs each spider may have)
Spider (hidden centre) Halloween cupcake recipe


(Little footnote on strings/laces.... I used real fruit strings(see image below) but these could be strawberry laces or liquorish

Tuesday 21 October 2014

Personalise your own Christmas stockings


I was looking for small personalised stocking on the internet and was amazed that they were around £20.

I know these aren't quite as good, but they cost me £3.75 each, and were very simple to make. In fact if you have older children, they might be able to do this themselves.

You'll need


  • Christmas stockings (£3 from Morrisons)
  • Coloured felt (50p per sheet from Hobbycraft)
  • Embroidery thread
  • Needle
  • Sharp scissor
  • Pen
  • Paper and laptop (optional)
  • Glue (optional)

Let's get on...

ok, so the laptop is optional, but helps if you want to trace the letters onto paper first.

I usually use WordArt to create the letters in the correct size and then trace them onto paper.


Next, cut out the letter templates and draw around them on another piece of paper to create a second slightly smaller letter.


Draw around the larger letter (reversed - so the pen is on the back) on the white felt, and the smaller letter (reversed) on the coloured felt.

It may then help to glue or pin the two letters together and then on to the stocking.

Finally, using 3 strands of and backstitch, sew the letters on to the stocking with a single line.


Simples!

Thursday 16 October 2014

(No sew) personalised applique t-shirt

This is a really simple way to personalise a plain vest or t-shirt, with a name, word or design of your choice.


Bondaweb allows the design to be easily traced and then simply ironed on to your garment.

The design can then be stitched in place for extra decoration and security, or left as it is.

My personalised baby's Christmas vest took around 15 minutes start to end, and very little skill!

You will need

  • Laptop (optional to help with design)
  • Bondaweb
  • Pencil
  • Sharp scissors
  • Scraps of coloured material
  • Garment to personalise (vest, t-shirt, bag etc)
  • Iron

Let's do it!

So the laptop...this is to help get the lettering or design right.

To make this easy, to use Word Art to get the lettering the correct size for my item (make sure it will fit!!)


The main thing to remember is that once transferred the design will be reversed.

So take a screenshot, paste it into Paint and then flip the design so it's back to front


Then trace the design onto the smooth side of the bondaweb - one side feels like paper, the other is rough. It is important you always get the paper the right way up, or your design will be ironed on to your iron rather than the t shirt!


Next choose your material and most importantly make sure the design is still reversed and that the rough side is down. You should also be laying the design onto the back of the fabric.

If any of your letters (e.g. the O) look the same both ways around, it may help to also write your initial on the paper to help you determine the right side of the paper.

Use a hot iron to apply the design, making sure the heat is equally applied (right to the edges) and that steam is turned off.

 
Cut out the letters/design...


The bondaweb backing paper should then simply peel off


Finally lay out your design, the correct way round and on the correct side of your garment, and then iron.


If you fancy it, you can then add backstitching and buttons to embellish your design - here's one I made earlier