Wednesday 19 February 2014

Simply Delicious Steak and Ale Pie

Steak and mushroom and ale pie

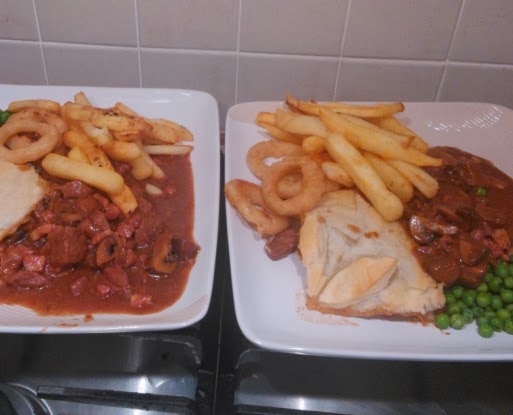
Very simple but very tasty Steak and Ale Pie which will very comfortably feed at least 4 adults - Served to 3 generations of my family last weekend and well received. Clean plates all round!

It can be prepared in advance and reheated when required so there is no slaving in the kitchen when your guests arrive.

You will need


  • A large frying pan
  • A pie, pyrex or casserole dish
  • 800g of diced braising steak
  • 200g of smoked bacon/lardons
  • Splash of olive oil
  • 1 pack of chestnut mushrooms
  • 2 large or 3 small onions
  • Tablespoon of flour
  • 200ml Beef stock
  • 500ml Real ale (I used Rev James)
  • Tomato puree
  • Ready to roll, or pre rolled puff pastry
Active cooking (i.e. prep and hob) 30 minutes - passive cooking (i.e. pie in oven) 2-3 hours

Let's do it!

  • Slice the onions into small chunks and quarter the mushrooms
  • Heat the oil in a large pan
  • Seal the beef on all sides and then add the onions
  • After the onions are starting to soften, add the bacon and mushrooms
  • Instead of draining off the juices, add a heaped tablespoon of plain flour. This will suck up the juices and help make a thick delicious sauce


  • Put your oven on to begin heating up to 180C
  • Add half of your ale and wait for the head to die down!

  • Make your stock and add this to the pan.
  • Allow to simmer for a few minutes and then transfer to your pie dish.
  • Put the pie dish in the oven uncovered and leave for an hour.
  • After an hour, stir the pie mix and top up with the remaining ale
  • Return the pie to the oven for an additional hour or two (stirring once or twice and turning the oven down if you are concerned your gravy is reducing or thickening too quickly)
Steak and ale pie recipe

    At this point you can either let the pie cool, or go on to the next step.
  • Take your pre-made pastry out of the fridge about 5-10 minutes before you want to start rolling/cooking it
  • Cut the pastry to fit on your pie and decorate with a few extra cut offs (don't go over the top as this can weigh the pastry down and stop it rising. If you do have extra pastry, you can always cook this on a baking tray separately from the main pie.)
  • If desired, brush with milk or egg so that the pastry will brown
  • Return the pie to the oven for the final time, and cook at 200C for 30 minutes, allowing an additional 5 minutes if you are cooking your pie from chilled
 
Remove from oven and you're all done. Yum yum yum!

Tuesday 11 February 2014

Am I silly to think this is wrong?

Earlier this week I had a Vertbaudet catalogue through the post.

If you're not familiar, they are the baby/child wing of La Redoute and do some lovely, but quite expensive clothes (often at discount prices). My daughter has had a few beautiful outfits and two gorgeous coats from Vertbaudet.

However, I've also bought a couple of maternity dresses from Vertbaudet and been disappointed by the fit.

Looking at their Before and After range of dresses, it dawned on me that the models couldn't actually be pregnant.

Aside from their bumps looking just a little odd, how could it be possible to have images of the same woman both heavily pregnant, and slim and beautiful?

 
So I asked them on Twitter, and guess what?
They aren't pregnant at all.


Does anyone else think this is silly? Wouldn't you rather see the dresses modelled by two different woman; A genuinely pregnant lady and a lady who has actually had a baby within the last few months?
 
Using someone who isn't pregnant just isn't representative of a pregnant body - you don't just grow a bump, you have bigger boobs, and bum and ankles and afterwards you don't spring straight back.
 
 
My husband says I'm just bitter that I'm fat, and Vertbaudet appear to have declined to comment any further.
 
I'd be really interested if you want to leave comments below!


Thursday 6 February 2014

9 square heart check square

9 square heart knitting pattern patchwork square

9 square heart knitting pattern patchwork square


All purl rows are normal purl rows.
 
Pattern will be formed from occasional purl stitches during a knit row. These are shown on the chart above as ^ signs.

4 square heart chart

All purl rows are normal purl rows.
 
Pattern will be formed from occasional purl stitches during a knit row. These are shown on the chart above as ^ signs.

4 square heart patchwork square knitting pattern

4 square heart patchwork square knitting pattern


See my gallery of other squares

Heart charts for knitted patchwork squares

For both of these charts
 
^ shown on a knit row is a purl stitch
^ shown on a purl row is a knit stitch
 
This creates a bump, which will later form the moss stitch border and heart design.

Single colour


Heart patchwork square knitting pattern


Heart patchwork square knitting pattern


Two colour heart chart

Two colour heart patchwork square knitting pattern

Two colour heart patchwork square knitting pattern
 

See my gallery of other squares
 

Simple stripe and reverse stripe knitted patchwork square

Simple stripe


simple stripe knitted patchwork square patter


Two colours, A and B
  • Cast on 37 in A
  • Knit 4 rows in stocking stitch (alternate between k and p rows)
  • Change to B and continue for more 2 rows. (There is no need to cut the first colour off, just make sure that it's not so tight that it's pulling the square when you next change colour)
  • 4 rows in A
  • 2 rows in B
  • Continue until you have knitted 50 lines and then cast off.
Reverse simple stripe

Reverse simple stripe patchwork square knitting pattern

 
Follow the instructions as above for Simple Stripe, but then turn the finished square over, so that what was the back becomes the front!

See my gallery of other squares

How to make a simple but beautiful knitted patchwork blanket

This project is great for all abilities as you can make it as big or small, and as simple or complicated as you like!


Simple but beautiful knitted patchwork blanket pattern


It's particularly great for using up small amounts of wool, and if you do make a mistake or mess up a square you haven't got loads of work to unpick or to lose if you need to start it again.
 
You can also ask friends or family to contribute a square if you get bored before reaching the size you wanted!
 
I made mine using 49 squares and a pattern from a book I was given for Christmas. All in all it took me about 4 months, averaging about 1.5 hours per square.

Outline instructions...

  1. Knit lots of squares! - for ideas, visit my gallery of squares, this is updated regularly so please keep checking back
 
2. Lay out all the squares in the order/pattern required
3. Tidy the squares into piles (keeping the order)
 
4. Sew each of the piles into a long strip and then sew the long strips together. When sewing the strips together, make sure that each square lines up with its neighbour. This may mean shaping or stretching certain squares with your hands as you go to ensure that they are all the same size and fit into the grid pattern.


6. Edge (see below for basic tips - full details can be found on my Full Patchwork Blanket Instructions page)
 

What you'll need...

  • Basic knitting ability - cast on, knit and cast off is all that is needed for the most basic blanket, and even these look great if done in a mixture of colours
  • Knitting needles - between size 3mm and 4mm, the exact size doesn't matter, but use the same size throughout to ensure that all the squares come out roughly the same size and shape
  • Circular knitting needle - roughly the same size as the ones used for the main knitting. This is used to edge the work. You won't be knitting in the round, but the cable that joins the two needles is needed because of the large number of stitches that you will be working with across each edge, normal needles just wouldn't be long enough and you'd keep losing stitches off the end! (Edging isn't essential if you don't fancy it, just announce the blanket is finished when it has been sewn together and stop!)
  • Wool - double knit wool, any colours, might be nice to make one of these in different shades of the same colour
  • Darning needle or bodkin - to sew the squares together

Wednesday 5 February 2014

Simple sewing project - bean bag nest chair

I designed and made this bean bag chair for my little girl after seeing one in the JoJo Mama Bebe catalogue for £45.
 
It was pretty easy to make and I'm actually surprised how much my 1 year old likes it. She flops down onto it and even sits on it like she's meant to! Now she's outgrown her bouncy chair this makes a good place for her to chillax.
 
Hopefully you can see from the images below the bean bag is shaped (not just a bag shape) so for small babies it can be used like a baby nest bed, and for toddlers as a shaped chair.


Bean bag nest chair pattern

 
You will need
  • 2m of fabric
  • A sewing machine, thread and pins
  • A pen
  • A scissors
  • A ruler
  • A bean bag net (search ebay or amazon, they are about £1.50)
  • 1-1.5 cubic feet of beans
 
The bean bag net is a safety measure so that all the beans are contained within a net within the fabric cover. This means that if a seam splits beans won't go everywhere (particularly important if it's for a toddler who might eat them!). It also means that the fabric cover can be made removable so that it can be washed.

What to do...


1. Draw out two sides and then cut around them approx 1cm from the line. Mark this piece (A)
 
2. Draw a piece 45cm by 45cm and the cut 1cm from the line (seat part). Mark this piece (B)
 
3. Draw a piece 70cm by 45cm and then cut 1cm from the line (back and half of base) Mark this piece. (C)
 
3. Draw a piece 45cm by 15cm and then cut 1cm from the line (top of seat) Mark this piece. (D)
 
4. Draw a piece 45cm by 40cm and then cut 1cm from the line (front panel and half of base). Mark this piece (E)

 
5. Start with pieces C and D. With right sides facing, pin the two pieces together along one of the edges (that are the same length). Then sew along the pencil line.
 
6. Continuing with this piece, create a 1cm hem on the top edge (edge opposite the one you've just sewed onto piece D) of piece C.
 
7. Next with right sides facing, pin the piece you are working on (C&D) to B and then sew along the pencil line.
 
8. Repeat this with piece E.
 
9. Finally hem the bottom edge of piece E. (The two hemed edges will come together to make an envelope in the end)


10. With right sides facing, pin the diagonal edge of A to B, then stitch along the line.
 
11. Next pin the 15cm edge to D and sew
 
12. Then the other 15cm edge to E and sew. E will also reach part way onto the base (But don't sew this yet as it will make doing the other side harder)
 
13. From the diagram you should be able to see how piece C will now fold and sew down the side - C is long enough to also reach part way across the base (But don't sew this bit yet or it will make doing the other side harder)
 
14. Repeat from step 10 on the other side.


15. Now go back and finish off the base. Sew all the way to the hem on piece E, and up to the same point on piece C, this will leave a flap on piece C that will tuck under piece E when the bag is complete (think envelope or pillow case)
 
16. Repeat on the other side.
 
17. Turn the bag the right way out and shake.
18. Tip the beans into the net. (I'd suggest doing this in the garden as it is not as easy as you'd expect - the static makes them stick to everything!)
 
19. Put the cover onto the bean net and make sure the flaps are on the base and closed
 
20. Watch your little one sit, climb, lie and play on their new bean bag chair. x

Upsy Daisy knitting chart pattern for child's jumper


Upsy daisy knitting pattern chart

Here is a pattern I put together for my little girl who loves Upsy Daisy.

The chart can basically be added to any child jumper pattern.

Simple party bunting

A simple decoration for any party or event.
 
I'm personalising mine with my little one's name for her Christening.
 
What you'll need
  • Coloured paper or thin card
  • Scissors
  • Pen/pencil
  • Ruler
  • Hole punch
  • String or curling ribbon (usually used for decorating presents)
  • Glue stick (if adding extra decoration)
 
1. Take a piece of coloured paper and mark the centre of the top edge and the centre point between the first mark and each edge, mark these two points on the bottom edge
 
2. Draw a diagonal line from the top left corner to the first mark, then from the first mark to the second mark, the second mark to the third mark, and the third mark to the top right hand corner
 
3. Repeat these steps on 3 or 4 more pieces of paper


4. Cut along the lines you have drawn, this will create three full flags and two halves.
 
5. Turn the two halves around and sellotape them together so that they make a full flag. (You may want to mix and match colours here)
 
6. Using just one side of the hole punch at a time, punch a hole in the top two corners of the flag (the shortest side should be at the top)
7. Repeat steps 4 to 6 for all flags
 
8. (optional) Use the cut out pieces from the hole punch to decorate some of the flags. I spelt out my baby's name when I was making decorations for her Christening.
 
9. Thread the ribbon from the front through the first hole and then back through the second, and then repeat for all remaining flags - making sure that the majority of the ribbon is always on the same side
 
10. Create a loop at each end - this helps with the hanging, but also makes sure the flags don't slide off the end!
 
11. Hang your decoration from several points along the chain (so that it creates a scalloped effect)
 
12. Stand back and enjoy!

Quick, simple but really effective room/nursery decoration

 
spaceman nursery decoration

Feel like you did it, but with minimal effort!
Make a beautiful nursery without any stencilling or faffing about with borders - really cheaply too.

These wall stickers are simple to apply and are meant to last 7 years, or come off without any damage to the wall.

More detail?

Ok, first steps, choose yourself a theme - butterflies, space and stars, jungle, trains, anything, then search ebay for personalised wall stickers. There are literally hundreds.
 
Below are instructions for how I finished off my little boy's room in less than an hour whilst 7.5 months pregnant!
 
All the stickers, including personalisation cost less than £20.
 
You'll also need sharp scissors and some masking tape.
 
  • Your stickers will be supplied on backing paper - initially this looks terrifying!
  • If your sticker isn't in one piece, cut it into sections to make it easier to apply (e.g. in mine I removed the name)
  • You can also cut off some of the excess paper. But do keep the top edge straight so you make sure the design is straight before you commit to sticking it down. 
  • Stick the design to the wall (the correct way round - NOT reversed) with masking tape.
  • Very carefully start to peel the backing paper away, this leaves the sticker on the thin paper at the front. Again this can be done in sections, rather than one swift movement - cut the backing paper away and gently smooth the top layer (with the design on it) onto the wall. A credit card may be useful to help smooth out any bubbles


  • For my sticker, I removed did the right side first, then the left, and then this left the middle. To get the backing paper off I then had to remove the masking tape and carefully remove the middle section from the top.
  • Once the sticker is applied to the wall - still on the thin top layer of paper, smooth the full sticker down one more time and then leave for an hour.


  • When you're ready to remove the paper, start from a bottom corner and carefully peel back (making sure none of the design is left behind)
  • Again this doesn't have to be done in one go, it's quite easy to stop and cut chunks of the paper off as you go


  • In addition to my main sticker, I also added stars randomly around the room (and then stood back to admire my work!)

    Finally I'll add the name - this has been faked in paint.net as we're keeping the name secret until baby is born, but the name sticker is very easily applied in exactly the same way as the main sticker.
 
Hope you enjoy decorating your room and all the praise for your "hard" work!!

Iggle Piggle cake decoration

My little girl is approaching her first birthday and I've been looking at getting her a professional cake. I was surprised that the ones I liked started at £65!!
 
In The Night Garden and Iggle Piggle are amazingly popular with babies and toddlers. Birthday cakes can be expensive, so why not bake a basic sponge and top it with this simple Iggle Piggle design?
 

You will need...

  • Icing
  • Blue food colouring
  • Red food colouring
  • A knife
  • A teaspoon or cocktail stick
  • A rolling pin (optional)
  • Grease proof paper
  • A pen
 
1. Print and trace a drawing of Iggle Piggle, I used the one from the BBC colouring sheet


2. You need to make your icing blue.
  • Shape the icing so that there is a dip in the middle, then with the end of teaspoon drip a couple of drops of colour.
  • Fold the colour into the icing, trying not to directly touch the colour while it is unmixed and wet
  • Shape the icing again and then add a couple more drops
  • Fold the icing until the colour is evenly spread
 3. Make sure that the greaseproof paper is shiny side up so that your the icing doesn't stick. This may mean Iggle Piggle faces the other way, depending on which side of the paper you drew your design.
 
4. We're now going to start filling in the design. When I first started I thought I was going to cut out each shape with a knife and then put them back together like a jigsaw, but after the first couple of pieces (head and main body) I just started to take chunks of icing and moulded them into shape with my fingers (using the lines on the greaseproof paper as a guide)
 
5. Using slightly damp fingers blend the pieces and shapes together and smooth out any rough edges or marks


6. Take two small pieces of white icing and makes eyes, and two small balls of icing to make pupils (these should really be black but I didn't have anything suitable) Then make a blue nose and white smile.
 

7. Colour some icing red (as described in step 2) and finish off the design with four pieces of red hair and Iggle Piggle's trademark blanket. (I went outside the guide here). I also put a couple of small pieces of red under Iggle Piggle's feet for definition.

8. Allow to dry for around 24 hours and then gently peel the backing paper/drawing away.

Iggle Piggle cake decoration

 
9. Keep in an air tight container until the big day
 
10. Stick your fantastic, homemade, Iggle Piggle cake decoration to any cake with jam or a little bit of icing sugar and water...
 
Now isn't that a pip!!!
When you look at the finished picture above, the blue looks a little patchy and shiny, this is for two reasons - the first is that it is still slightly wet and needs to dry/harden, the second is that I used a completely natural food colour. If I'd used a stronger blue dye the results would have been better (but slightly less baby friendly).

My signature butternut squash risotto

Not particularly quick to make, but very simple and everything is in one pot, so there is no juggling of hot pans or worrying about timings.
 
I usually make it with bacon bits or pancetta and chicken stock, but last week I did it for a veggie friend and we all had it made with vegetable stock. It was just as good.


You will need (serves 4)
 
  • A medium butternut squash
  • A large onion
  • 4 cloves of garlic
  • Pancetta, bacon bits or lardons
  • 2 cubes of stock (chicken or vegetable, or one of each)
  • A large handful of cheese
  • 75g of risotto rice per person (300g)
  • White wine
  • Pinenuts (optional)
  • Seasoning
  • Boiling water
  • Some oil
  • A baking tray
  • A large saucepan

 
How long will it take?
 
5-10 minutes prep
50 minutes cooking time

 
What do you do?
 
  1. Put the oven on to heat up to 180 while you prepare the butternut squash
  2. Prepare the squash – I usually cut the top off, cut the bottom off, so it has a
         flat base. Then cut it into two at the base of the neck (before it bulges
         out). Then, rather than peeling the thick skin with a peeler, I just slice
         it off with a knife. You loose a bit more of the flesh, but I think it’s
         worth it for the ease. Once peeled, cut the smaller (neck part) into 1.5cm
         cubes. Slice the other part in half length ways and then scoop the seeds
         out with a spoon. This can then also be cut into cubes.
  3. Put the cubed squash onto the baking tray with a drizzle of oil and a crushed clove of garlic
  4. Whack the squash in the oven for about 45 minutes. While the squash is roasting, you can be getting on with the rest of the risotto. Alternatively the squash can be roasted in advance and the risotto prepared separately.
  5. Chop the onion and put this into the saucepan with some oil and the remaining cloves of garlic (crushed).
  6. Fry the onions until soft then add the rice and a little more oil
  7. Put the kettle on to boil, and gently fry the rice until it starts to look more transparent
  8. Make the stock following the instructions on the packet and then add a good slug of wine (two small glasses)
  9. Now we're going to start adding the stock slowly to the rice. Make sure it's over a low heat and then add enough stock to cover the rice. Gently stir until this has been absorbed.
  10. Add some more stock, gently stirring every so often so that it doesn't stick to the pan
  11. Keep adding stock until its all in. If the rice isn't soft, just keep adding hot water until it gets there
  12. Take the squash out of the oven. Mash half and set the other half to one side.
  13. Put the pinenuts onto the baking tray and put into the oven (keep a close eye on these as they can burn easily)
  14. Mix the mashed and remaining cubed squash through the risotto.
  15. Throw in the cheese and mix through. This makes it creamy and sticky (gorgeous)
  16. Top with the toasted pinenuts and serve.
 
Yum yum yum!

Sticky lemon iced traybake

Sticky lemon iced traybake


Soft, moist and deliciously zingy and sweet. Yum Yum!

It's unlikely to be the most attractive cake you'll ever make, but it is really quick, simple and perfect for guests, parties or munching after dinner!

You will need

 Equipment
A tin (like one you might make lasagne in) lined with baking paper or well greased.
(Whisk, large bowl and an oven)
 

For the cake
2 large eggs
150g self raising flour
150g of butter or marg
150g of caster sugar
2 tablespoons of marmalade or apricot jam
 
For the icing
200g of icing sugar
Lemon juice (or flavoring)
Orange juice

Making the cake

  • Pre heat oven to 160 degrees C
  • Put caster sugar and butter together in a large bowl and mix until light and fluffy
  • Add half the flour and one egg. Mix well
  • Add the other egg and rest of the flour. Mix well
  • Add the jam/marmalade and mix in.
  • Tip the mixture into the tray and let it find a level.
  • Bake for 25 minutes until springy to touch and light brown in colour
  • Leave to cool in the tin

Icing the cake

  • Make a few small holes in the cake using a skewer (to allow the icing to slightly seep into and flavour the cake)
  • Sift the icing sugar into a bowl
  • Add a big squirt of lemon juice and begin mixing into the icing sugar with a spoon
  • Add a couple of drops of orange juice at a time until you have a thick icing. It should just pour but not be too runny (or it will run off the cake before it sets)
  • If you do add too much liquid add a bit more icing sugar to cancel it out.
  • Pour the icing over the cake and smooth to edges.
  • Allow to set in the tin.

When completely set, remove from the tin and cut into fingers or smaller squares (if you're expecting lots of people). Enjoy!!