Showing posts with label Knitting. Show all posts

Wednesday, 26 March 2014

Full patchwork blanket instructions

Please note this page is still in progress and instructions/links do not yet exist for all squares.


You will need

  • 1 pair of 3.75 knitting needs
  • 1 pair of circular needles of the same size (for edging)
  • A darning needle
  • 1 * 100g ball of double knit wool in each of the following colours

(From top left) - Purple, light pink, dark pink, light blue, dark yellow, dark green, lilac, light yellow, dark blue, light green.

Knitting squares

This blanket is made up of 49 simple to knit squares
Instructions are linked from each of the names below

Ref Description/link Number
1alight blue and dark yellow stripe 6
1blight pink and purple 6
1clight yellow and lilac 6
1d dark pink and pale green 6
2 light yellow parallel lines 3
3 purple diagonal lines 3
4 dark yellow horizonal lines 2
5 Light green ribbed stripes 3
6Lilac plain 2
7 Dark green moss border 3
8 Light blue moss 4
9 Dark blue moss variation 5

Plenty more ideas for squares can be found on my knitting page

The layout


2
1a
4
1b
7
1c
5
1b
9
1c
8
1d
9
1a
7
1d
2
1a
3
1b
6
1a
8
1b
9
1c
8
1d
6
1c
5
1d
4
1a
3
1d
9
1a
8
1b
9
1c
5
1b
3
1c
2
1d
7
 
(Further advice on sewing laying out and sewing the squares together can be found on the How to make a simple but beautiful knitted blanket page)


Edging the blanket

My tip for edging the blanket is to use a circular knitting needle.

The length of the cable is unimportant, as you won't actually be knitting in the round, however having the extra length will make the large number of stitches you'll be working with on each side much more manageable.

  • Using dark green or lilac (you'll have most of these colours left)
  • Start at the bottom edge and with the right side facing pick up 259 stitches - that is 37 per square (one for each stitch you cast on/off for each square)
  • Work one row in moss stitch (alternating k then p for each stitch)
  • Increase one stitch each end at next and every right side row
  • Continue in moss stitch for 8 rows (don't forget the right side increases)
  • Cast off
Repeat on remaining 3 sides and then neatly sew the border together at each corner.

Congratulations - you'll have finished your amazing patchwork blanket.


Most basic squares

These are the simplest squares and a great starting point.  They also make quick "filler" squares, if you are making a large blanket, then a few simple striped or plain squares will help bulk out the blanket and are the quickest to knit.

Basic plain square

They don't come any simpler than this, however, with 2 or more different coloured wools you could still make a beautiful blanket without ever doing anything more complicated than knitting plain squares.


Cast on 37 stitches
Continue in stocking stitch (that is, normal knitting, a knit row followed by a purl row, followed by a knit row followed by a purl row etc etc) for 50 rows
Cast off!

Stripe square

Almost as simple as the plain square - simple stripes!


Choose two contrasting colours, and call them A and B
  • Cast on 37 stitches in colour A
  • Work 4 rows in stocking stitch (alternate between k and p rows)
  • Change to B and continue for 4 more rows. (There is no need to cut the first colour off as you will always change colour on the same side, just make sure that it's not so tight that it's pulling the square out of shape when you next change colour)
  • 4 rows in A
  • 4 rows in B
  • Continue until you have 48 rows (12 stripes)
  • Cast off

Thursday, 6 February 2014

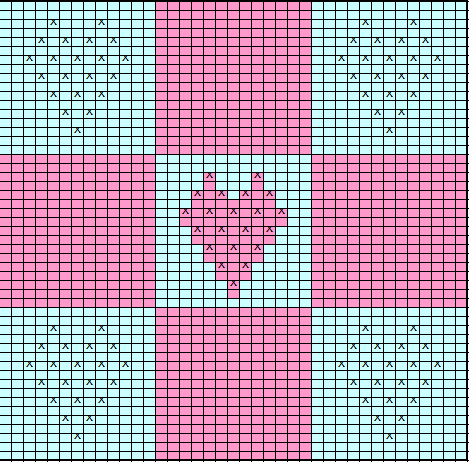
9 square heart check square

9 square heart knitting pattern patchwork square

9 square heart knitting pattern patchwork square


All purl rows are normal purl rows.
 
Pattern will be formed from occasional purl stitches during a knit row. These are shown on the chart above as ^ signs.

4 square heart chart

All purl rows are normal purl rows.
 
Pattern will be formed from occasional purl stitches during a knit row. These are shown on the chart above as ^ signs.

4 square heart patchwork square knitting pattern

4 square heart patchwork square knitting pattern


See my gallery of other squares

Heart charts for knitted patchwork squares

For both of these charts
 
^ shown on a knit row is a purl stitch
^ shown on a purl row is a knit stitch
 
This creates a bump, which will later form the moss stitch border and heart design.

Single colour


Heart patchwork square knitting pattern


Heart patchwork square knitting pattern


Two colour heart chart

Two colour heart patchwork square knitting pattern

Two colour heart patchwork square knitting pattern
 

See my gallery of other squares
 

Simple stripe and reverse stripe knitted patchwork square

Simple stripe


simple stripe knitted patchwork square patter


Two colours, A and B
  • Cast on 37 in A
  • Knit 4 rows in stocking stitch (alternate between k and p rows)
  • Change to B and continue for more 2 rows. (There is no need to cut the first colour off, just make sure that it's not so tight that it's pulling the square when you next change colour)
  • 4 rows in A
  • 2 rows in B
  • Continue until you have knitted 50 lines and then cast off.
Reverse simple stripe

Reverse simple stripe patchwork square knitting pattern

 
Follow the instructions as above for Simple Stripe, but then turn the finished square over, so that what was the back becomes the front!

See my gallery of other squares

How to make a simple but beautiful knitted patchwork blanket

This project is great for all abilities as you can make it as big or small, and as simple or complicated as you like!


Simple but beautiful knitted patchwork blanket pattern


It's particularly great for using up small amounts of wool, and if you do make a mistake or mess up a square you haven't got loads of work to unpick or to lose if you need to start it again.
 
You can also ask friends or family to contribute a square if you get bored before reaching the size you wanted!
 
I made mine using 49 squares and a pattern from a book I was given for Christmas. All in all it took me about 4 months, averaging about 1.5 hours per square.

Outline instructions...

  1. Knit lots of squares! - for ideas, visit my gallery of squares, this is updated regularly so please keep checking back
 
2. Lay out all the squares in the order/pattern required
3. Tidy the squares into piles (keeping the order)
 
4. Sew each of the piles into a long strip and then sew the long strips together. When sewing the strips together, make sure that each square lines up with its neighbour. This may mean shaping or stretching certain squares with your hands as you go to ensure that they are all the same size and fit into the grid pattern.


6. Edge (see below for basic tips - full details can be found on my Full Patchwork Blanket Instructions page)
 

What you'll need...

  • Basic knitting ability - cast on, knit and cast off is all that is needed for the most basic blanket, and even these look great if done in a mixture of colours
  • Knitting needles - between size 3mm and 4mm, the exact size doesn't matter, but use the same size throughout to ensure that all the squares come out roughly the same size and shape
  • Circular knitting needle - roughly the same size as the ones used for the main knitting. This is used to edge the work. You won't be knitting in the round, but the cable that joins the two needles is needed because of the large number of stitches that you will be working with across each edge, normal needles just wouldn't be long enough and you'd keep losing stitches off the end! (Edging isn't essential if you don't fancy it, just announce the blanket is finished when it has been sewn together and stop!)
  • Wool - double knit wool, any colours, might be nice to make one of these in different shades of the same colour
  • Darning needle or bodkin - to sew the squares together

Wednesday, 5 February 2014

Upsy Daisy knitting chart pattern for child's jumper


Upsy daisy knitting pattern chart

Here is a pattern I put together for my little girl who loves Upsy Daisy.

The chart can basically be added to any child jumper pattern.